Azure Service Bus: Authentication with Entra, Identities, and Azure Credentials
Part 2: Writing to a Service Bus Queue using the Default Azure Credential

Engineering leader specializing in distributed event driven architectures, with a proven track record of building and mentoring high performing teams. My core expertise lies in dotnet/C#, modern messaging platforms, and Microsoft Azure, where I've architected and implemented highly scalable and available solutions. Explore my insights and deep dives into event driven architecture, patterns, and practices on my platform https://concurrentflows.com/.
Having led engineering teams in collaborative and remote-first environments, I prioritize mentorship, clear communication, and aligning technical roadmaps with stakeholder needs. My leadership foundation was strengthened through experience as a Sergeant in the U.S. Marine Corps, where I honed skills in team building and operational excellence.
Service Bus Series - Part 2
The previous post, Part 1: Creating an Azure Service Bus and Sending a Queue Message, covered setting up a basic Service Bus namespace, creating a simple queue and publishing a message via the Azure Portal. In this next part we'll begin interacting with the Azure Resources via code in C#, dotnet 8, setup auth with Azure Entra, and use an Azure Credential to access our namespace.
Authenticating
With Azure Service Bus there's two primary ways to authenticate a client app: Credentials w/ RBAC, and a Keyed Connection String. Standard best practice is to use a Credential via the DefaultAzureCredential This allows us to ultimately leverage a Managed Identity when our app is deployed to production, keeping our secrets out of configs, out of repos, and in the safest place they can be. That said, a simple connection string with a keyed access policy is an easy way to get started, but we won't cover that further here.
Understanding the Default Azure Credential
The Default Azure Credential is a composite of many dedicated credentialing options. Among them you have Visual Studio integration, CLI tools, and many more:
Wow, right!? What this allows us to do is setup our local dev environment using one Credential, while our deployed app leverages the Managed Identity. The Managed Identity itself does not exist beyond Azure. That's right, any attempt to authenticate via a Managed Identity outside of Azure results in failure to reach the protected 169.254.169.254:80 token host.
Configuring our Service Bus namespace
Today, we'll focus on getting a simple local app authenticated to our Service Bus using the Visual Studio integration, but similar steps would be taken with the other user level credentialing options. We're not deploying today, so we'll table the full-fledged Managed Identity for another time, our focus is Service Bus, not Entra fun.
For reference, this is also well covered via Microsoft Learn ⇒ Quickstart - Assign roles to your Microsoft Entra user, but we'll cover a little extra so ride with me here.
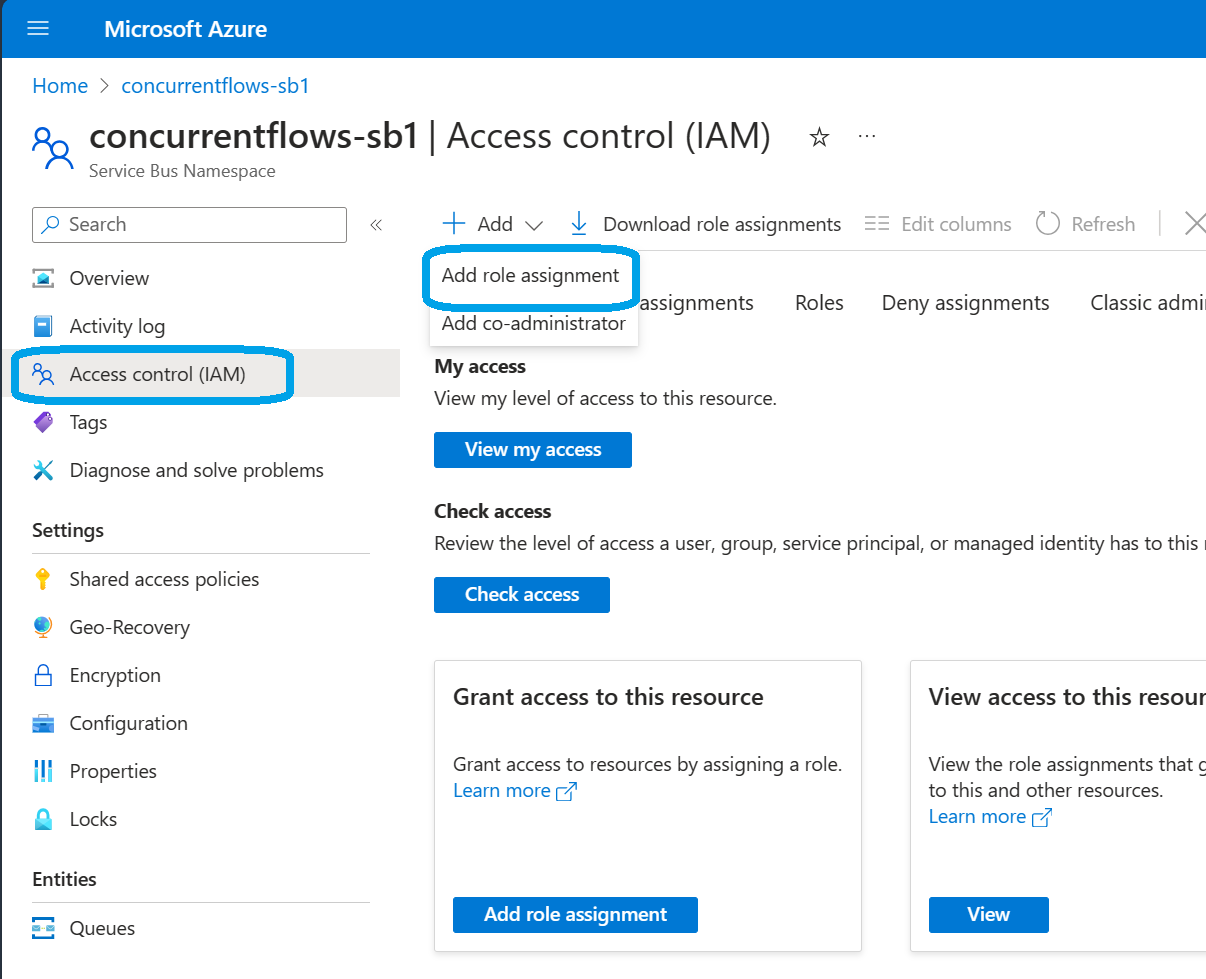
Our first step is to reach the Access Control section of Service Bus. This is done by clicking 'Access Control (IAM)' on the left ribbon. Then we'll 'Add role assignment' from the '+ Add' drop down.
With the selection of Roles in view, we have three built-in Roles to choose from
Azure Service Bus Data Owner: Use this role to allow full access to Service Bus namespace and its entities (queues, topics, subscriptions, and filters)
Azure Service Bus Data Sender: Use this role to allow sending messages to Service Bus queues and topics.
Azure Service Bus Data Receiver: Use this role to allow receiving messages from Service Bus queues and subscriptions.
[2] Azure built-in roles for Azure Service Bus | Microsoft Learn
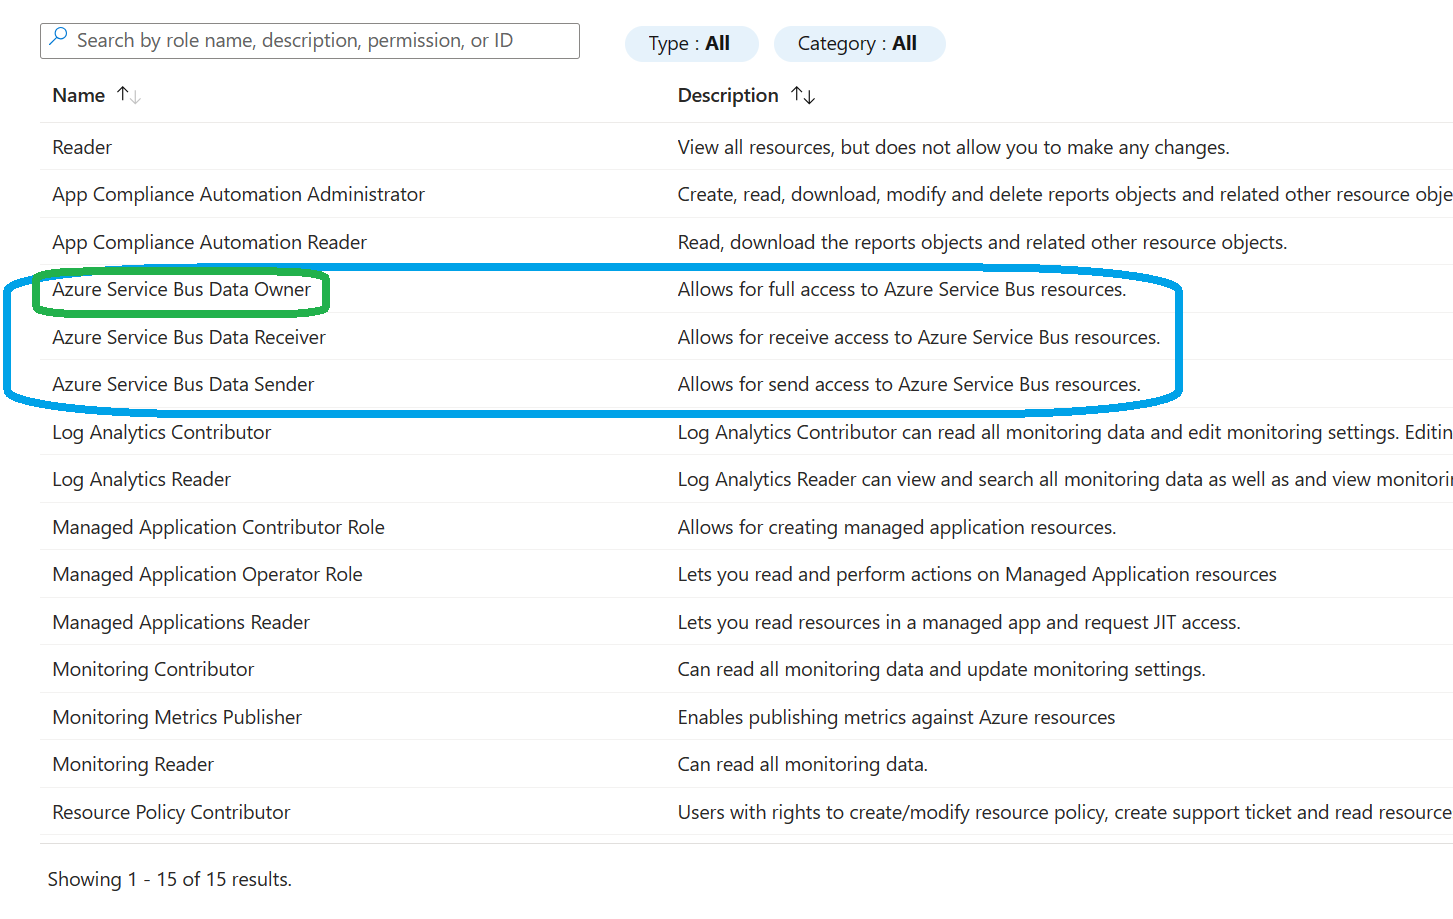
For our purposes, choose 'Azure Service Bus Data Owner' and select 'Next' at the bottom.
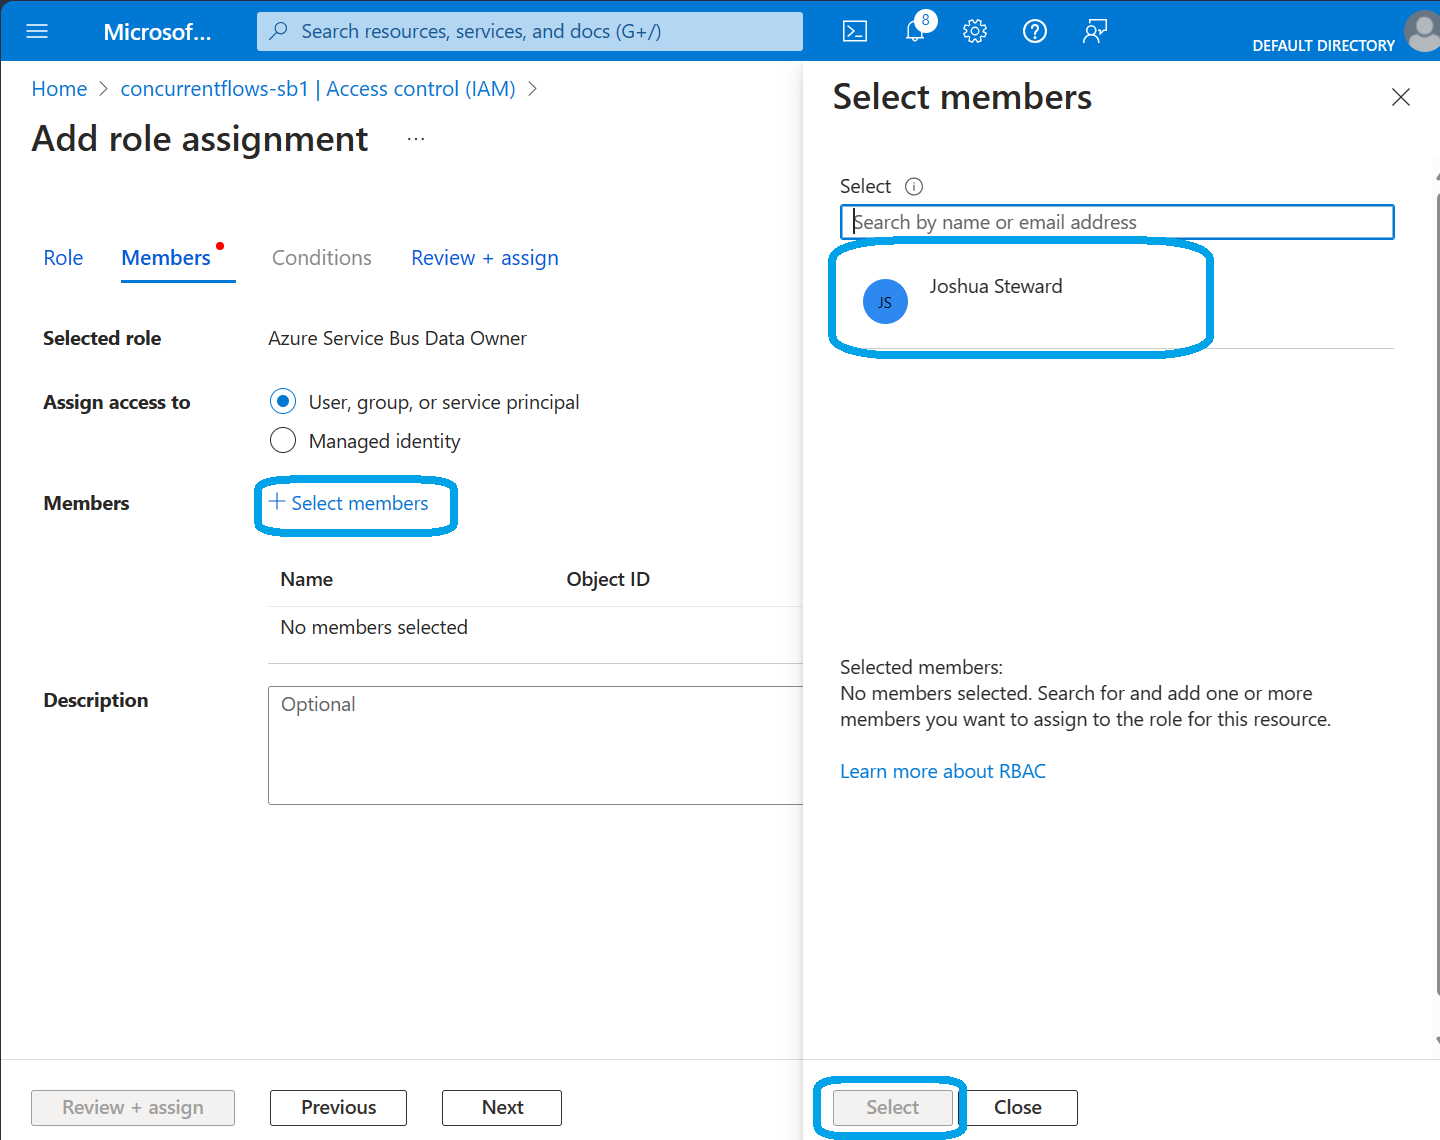
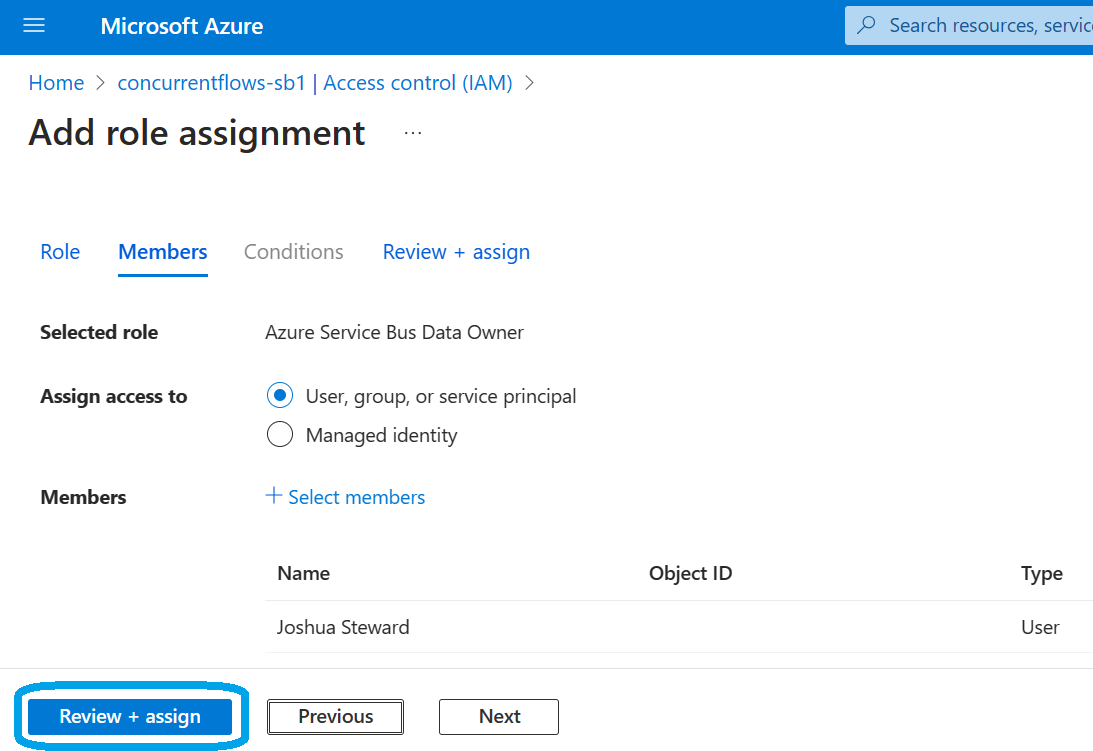
Now, we'll assign access to 'User, group, or service principal' by clicking '+ Select Members'. Next, if your identity is not already seen, use the search feature to find the correct Identity, select them and then we'll click 'Select' at the bottom of the dialog.
With the identity selected, click 'Review + assign' to move onto the final step and review your choices.
During the review, ensure the scope of privilege is correct and you've chosen the correct role to assign the desired Identity. Finally, click 'Review + assign' once more:
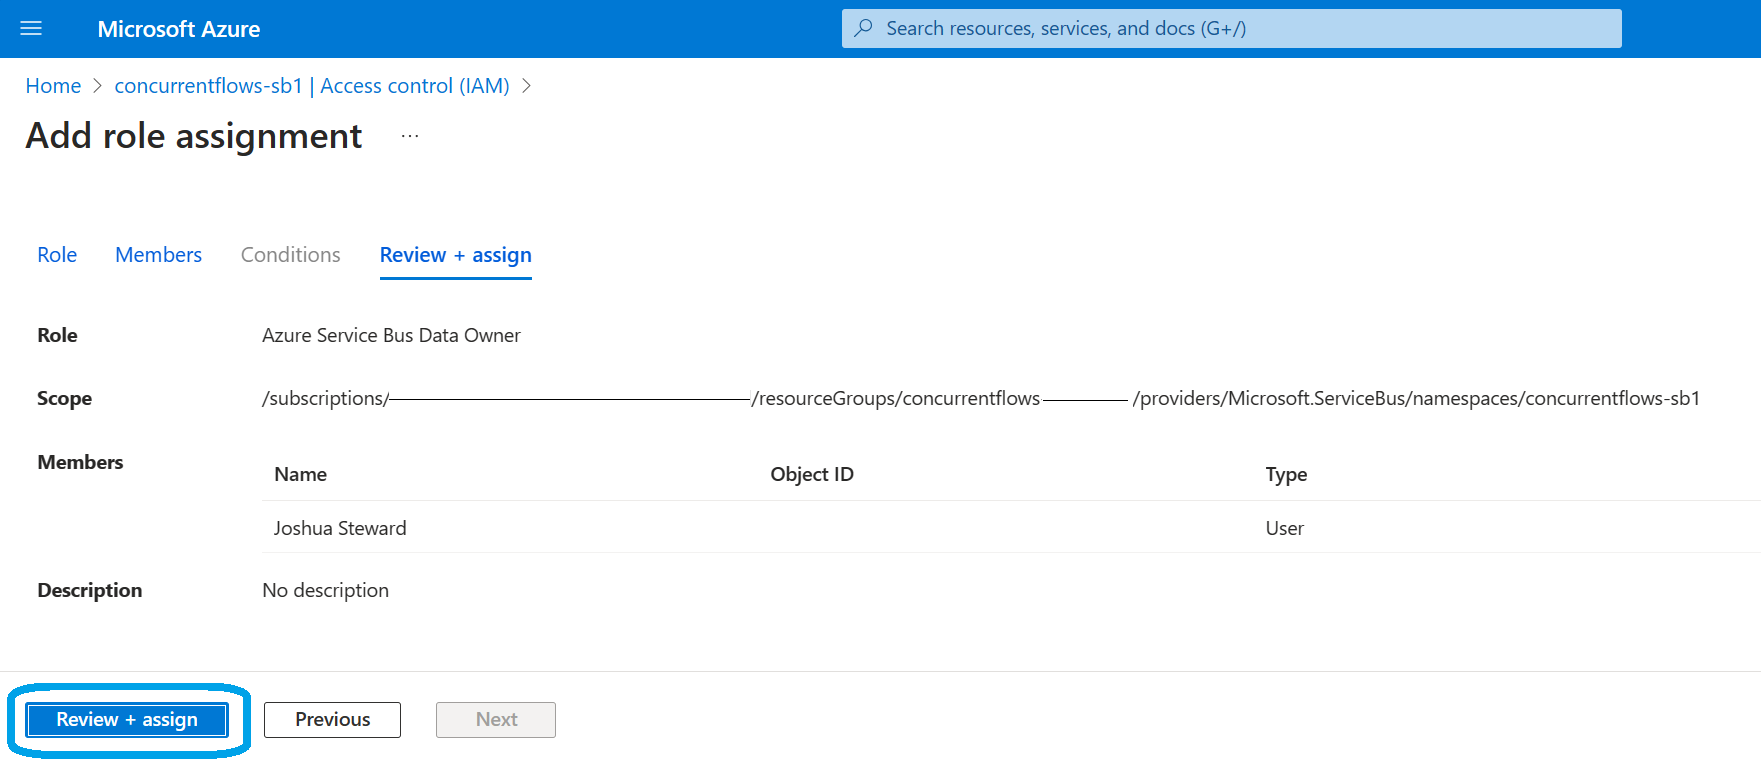
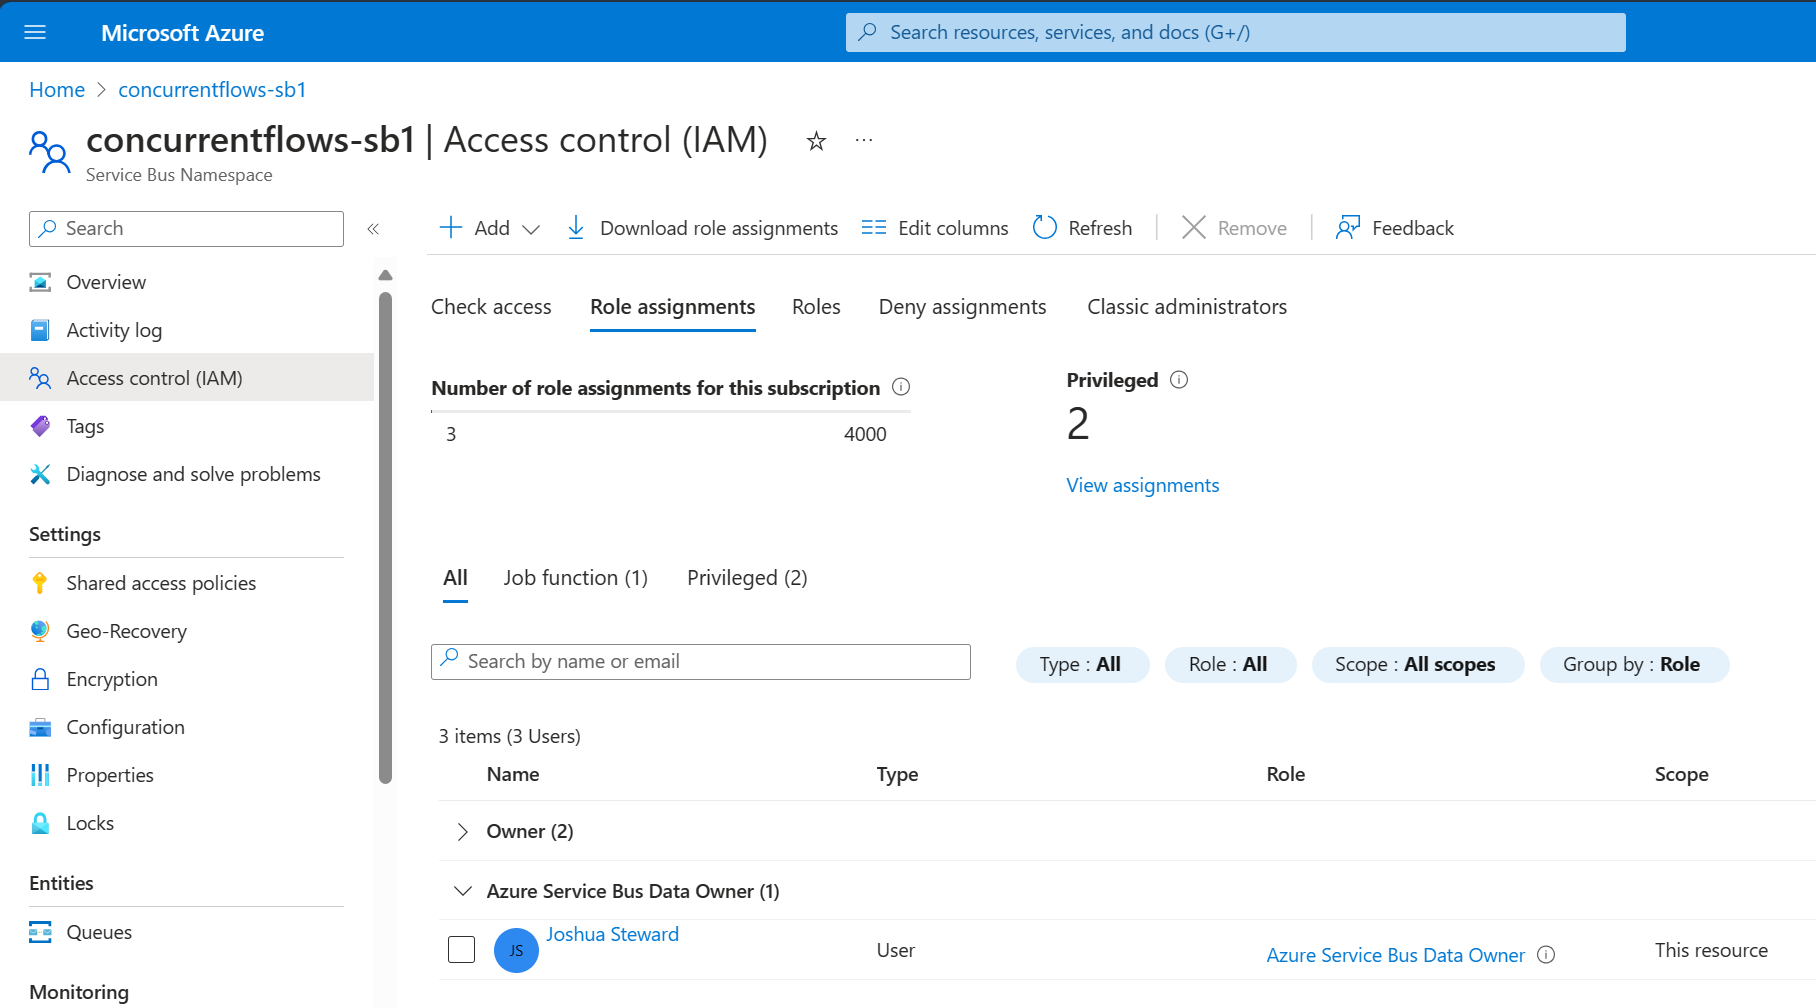
And that's it! The chosen Identity now has the Azure Service Bus Data Owner role, granting full access to the Service Bus namespace and its entities.
With that configured, we can now start building our first app, finally some code!
App Building Time!

We're going to create a simple hosted application that authenticates with our DefaultAzureCredential and sends a single 'Hello World' message to our existing Service Bus Queue.
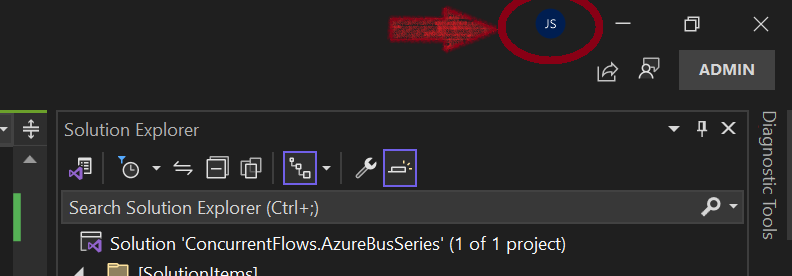
Preparatory; Ensure you are signed into Visual Studio with the Identity you've granted Service Bus access to.
Project Stand Up
Moving right along, create an empty .Net 8 console app to work in, any way you like is fine:
dotnet new console --framework net8.0
Next up we're going to need some packages:
dotnet add package Azure.Identity
dotnet add package Azure.Messaging.ServiceBus
dotnet add package Microsoft.Extensions.Hosting
Default Credentialing
Diving right in now, create a new class to hold our extension methods:
public static class Extensions
{
}
First to go in here will be our Credential builder, the DefaultAzureCredential will of course attempt a variety of authenticating methods until one succeeds. Typically, you'd have a local Credential and an Azure deployed Credential, but here we are simply sticking with the VisualStudioCredential attached to your sign-in. So, we'll exclude all of the Credentials we don't need:
public static DefaultAzureCredentialOptions SetVisualStudioCredentialingOnly(this DefaultAzureCredentialOptions options)
{
    //Not strictly necessary but less is more
    options.ExcludeAzureCliCredential = true;
    options.ExcludeAzureDeveloperCliCredential = true;
    options.ExcludeAzurePowerShellCredential = true;
    options.ExcludeEnvironmentCredential = true;
    options.ExcludeInteractiveBrowserCredential = true;
    options.ExcludeVisualStudioCodeCredential = true;
    options.ExcludeWorkloadIdentityCredential = true;
    options.ExcludeManagedIdentityCredential = true;
    options.ExcludeSharedTokenCacheCredential = true;
    return options;
}
Next to note about our credentialing is the appropriate Tenant Id. This is a bit buried in the docs, but left to its default Tenant Id the VisualStudioCredential may result in something like this:
Azure.Identity.CredentialUnavailableException: Process "..\IDE\CommonExtensions\Microsoft\Asal\TokenService\Microsoft.Asal.TokenService.exe" has failed with unexpected error: TS003: Error, TS004: Unable to get access token. 'AADSTS50020: User account '{EUII Hidden}' from identity provider 'live.com'
does not exist in tenant 'Microsoft Services'
Clearly the default Tenant here, emphasis mine, is incorrect. Following the underlying error code you'll find this ⇒ Error AADSTS50020 - ... | Microsoft Learn which isn't all that helpful in this scenario. What needs to happen is our credentialing method needs the correct Tenant Id passed to it. You can find your Tenant Id with the helpful Find tenant ID | Microsoft Learn. Simply searching for Entra will get you to the 'Default Directory', or similar in your setup, where you'll find the Tenant Id you need:
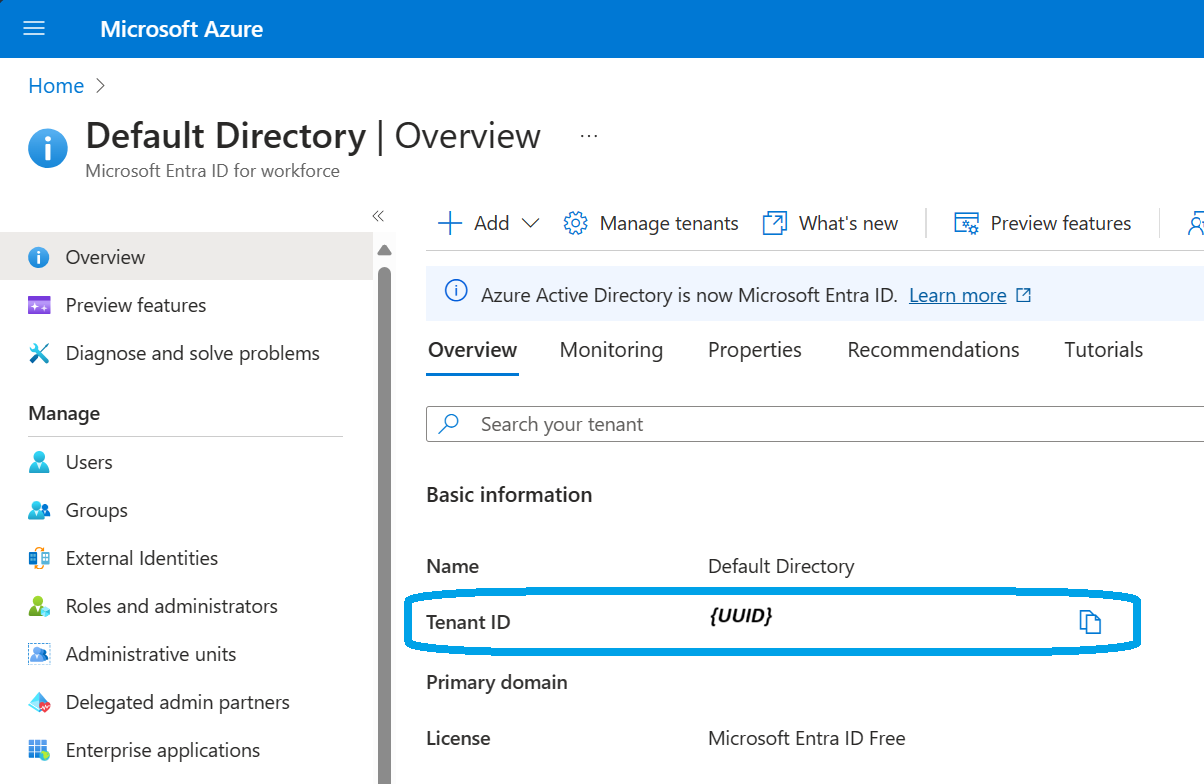
You'll take that Tenant Id and either bring it in hardcoded or, as I've done, store it in local secrets.json via Secret Manager, [3] Safe storage of app secrets in development | Microsoft Learn
With that in config, we can finish setting up our Credential:
public static DefaultAzureCredential CreateDefaultCredential(this IConfiguration config)
{
    var tenantId = config["TenantId"];
    return new(new DefaultAzureCredentialOptions()
    {
        TenantId = tenantId
    }.SetVisualStudioCredentialingOnly());
}
Service Bus Container Registration
Next, we'll set up our Service Bus components in the IServiceCollection, again in our Extensions.cs
private const string Identifier = "AzureBusSeries";

public static IServiceCollection AddServiceBusForQueueSender(
    this IServiceCollection services)
    => services
    .AddSingleton(sp =>
    {
        //Resolve the formed Config
        var config = sp.GetRequiredService<IConfiguration>();
        //Create our Credentials using the previously created methods
        var credential = config.CreateDefaultCredential();
        // {Your namespace}.servicebus.windows.net
        var hostName = config["ServiceBusHost"];

        var options = new ServiceBusClientOptions()
        {
            //Standard
            TransportType = ServiceBusTransportType.AmqpWebSockets,
            //Identify this client on the bus - best for logging
            Identifier = $"{Identifier}-Client"
        };

        return new ServiceBusClient(hostName, credential, options);
    })
    .AddSingleton(sp =>
    {
        //Resolve the formed Config
        var config = sp.GetRequiredService<IConfiguration>();
        //Resolve the existing client
        var client = sp.GetRequiredService<ServiceBusClient>();
        //Pull the Queue name
        var queue = config["Queue"];

        var options = new ServiceBusSenderOptions()
        {
            //Identify this Sender to the bus - best for logging
            Identifier = $"{Identifier}-Sender"
        };

        return client.CreateSender(queue, options);
    });
The QueueSender
Our hosted app contains a single process, it will be kicked off on app start up, send its message, and finally the app will wait for us to exit. The single process here takes the form of a simple BackgroundService that receives our configured Logger<T> and the registered ServiceBusSender. This keeps the lifetime of both the client and sender controlled via the ServiceCollection/Provider. Never insatiate a Sender per message, you will exhaust your connections and enjoy the failure.
public sealed class QueueSender
    : BackgroundService
{
    private readonly ILogger<QueueSender> logger;
    private readonly ServiceBusSender sender;

    public QueueSender(
        ILogger<QueueSender> logger,
        ServiceBusSender sender)

    {
        this.logger = logger ?? throw new ArgumentNullException(nameof(logger));
        this.sender = sender ?? throw new ArgumentNullException(nameof(sender));
    }

    //Abstract class method impl, executes and ends
    protected override async Task ExecuteAsync(CancellationToken stoppingToken)
    {
        using var timeout = new CancellationTokenSource(TimeSpan.FromSeconds(5));
        using var cts = CancellationTokenSource.CreateLinkedTokenSource(stoppingToken, timeout.Token);
        try
        {
            await sender.SendMessageAsync(new("Hello World"), cts.Token);

            logger.LogInformation("Sent Message!!!");
        }
        catch (OperationCanceledException ex)
            when (timeout.IsCancellationRequested)
        {
            logger.LogWarning(ex, "Operation timed out");
            throw;
        }
        catch (OperationCanceledException ex)
            when (stoppingToken.IsCancellationRequested)
        {
            logger.LogInformation(ex, "Shutdown early");
            throw;
        }
        catch (Exception ex)
        {
            logger.LogError(ex, "Unhandled exception");
            throw;
        }
    }
}
Tying it Together - Program.cs
Finally, the app standup in our Program.cs is very minimal. We create the App Builder, add our config, setup logging, register services, build the app, and run.
var builder = Host.CreateApplicationBuilder();

builder.Configuration.AddUserSecrets<Program>();

builder.Logging.AddConsole();

builder.Services
    .AddHostedService<QueueSender>()
    .AddServiceBusForQueueSender();

var app = builder.Build();

await app.RunAsync();
Hello World!
If you've been following along, the app should kick off, and logs should roll in like the following:

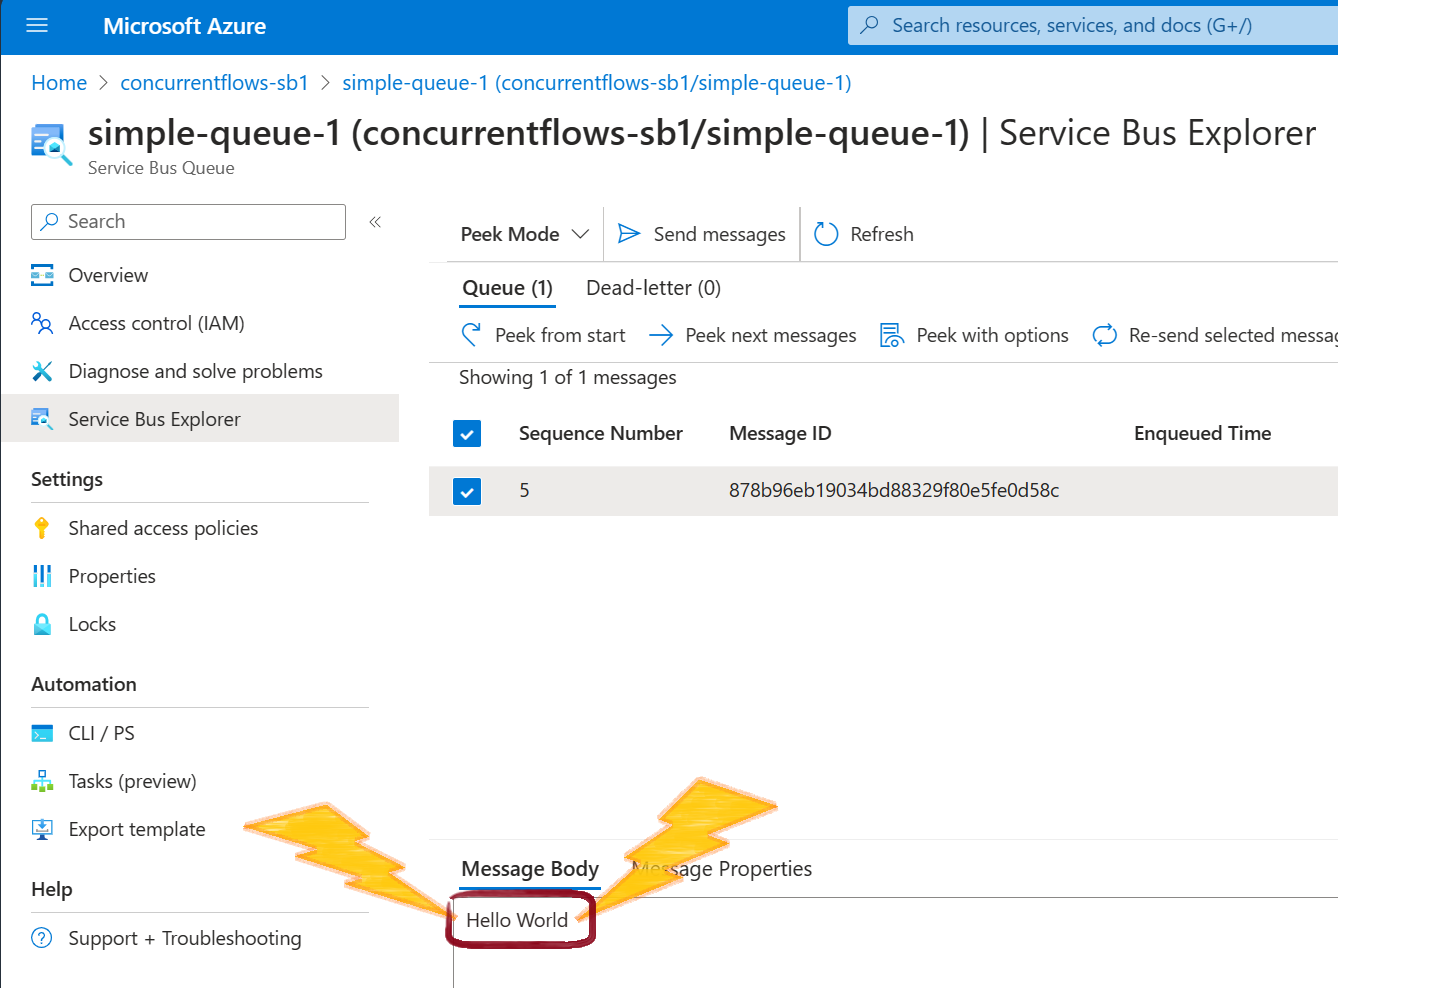
With that, check your Queue and our greeting message should have arrived:
Wrap Up & Repo
We're getting a bit deeper now. We've successfully authenticated our local app with our Credential. We've setup that process in our Service Bus Access Control and properly provisioned access to our Identity. Finally, we laid a foundation for deeper and more complex interaction with our Service Bus namespace. The first question that comes to my mind; This is fine, but how would you test this? If only Service Bus offered a Docker container 🙃
Of course, all code is available on GitHub ⇒ ConcurrentFlows.AzureBusSeries
If there's anything specific you'd like covered regarding Service Bus, please drop an ask in the comments!